前言
CentOS Linux 7、8/CentOS Stream 8已停止支持。由于CentOS Stream 9不是特别稳定,因此一部分用户会迁移至Rocky Linux
更新前请做好数据备份,避免数据丢失造成无法挽回的损失!
升级可能会导致ssh无法连接、网卡名称发生改变、无法开机等问题,请慎重考虑是否更新
更新系统前,建议先更新内核,以免部分软件包不兼容新内核(请使用yum -y install https://www.elrepo.org/elrepo-release-7.el7.elrepo.noarch.rpm安装ELRepo包)
卸载ELrepo:dnf -y remove elrepo*
https://mybailu.cn/archives/656
因RHEL大版本的兼容性原因,更新后,Nginx+PHP+MySQL(或MariaDB)及其它软件可能需要重新安装
更新方法
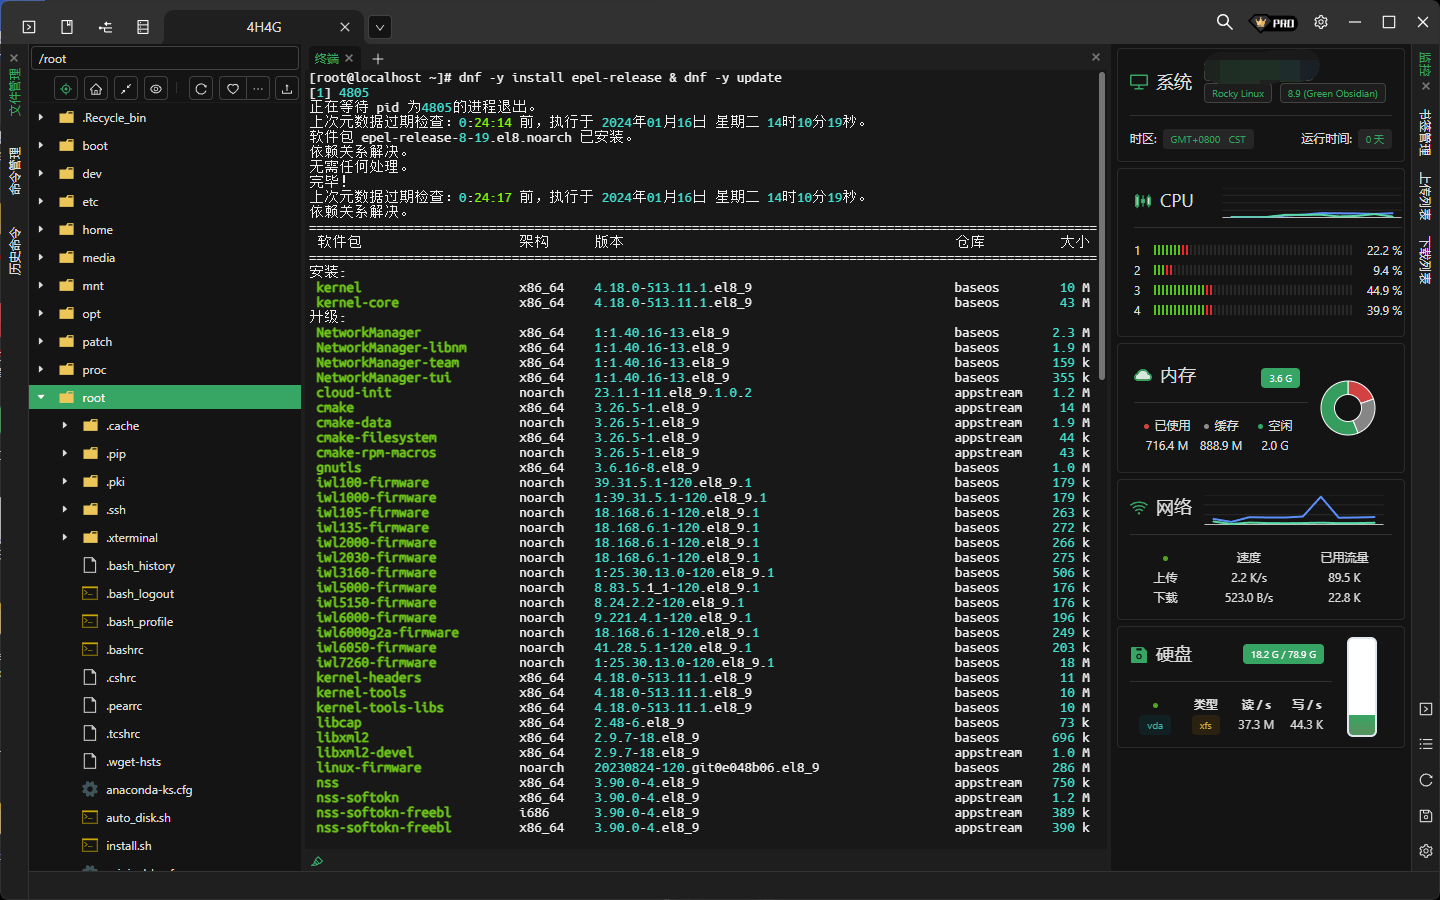
1.安装epel源和dnf
yum -y install epel-release && yum -y install dnf![图片[1]-CentOS7迁移Rocky Linux8教程-小鸟游星野的小窝](https://mybailu.cn/wp-content/uploads/2024/01/20240104060214405400.webp)
2.更新系统软件包,直到提示“No packages marked for update”
dnf -y upgrade如需换源,建议使用https://linuxmirrors.cn/use/
![图片[2]-CentOS7迁移Rocky Linux8教程-小鸟游星野的小窝](https://mybailu.cn/wp-content/uploads/2024/01/20240104060517277153.webp)
3.重启系统(若没有软件包更新请跳过此步)
reboot4.安装rpmconf和yum-utils
yum -y install rpmconf yum-utils![图片[3]-CentOS7迁移Rocky Linux8教程-小鸟游星野的小窝](https://mybailu.cn/wp-content/uploads/2024/01/20240104060711362431.webp)
5.执行rpmconf ,如果出现提示,请输入y和Enter继续,如果没提示,请继续往下看
rpmconf -a![图片[4]-CentOS7迁移Rocky Linux8教程-小鸟游星野的小窝](https://mybailu.cn/wp-content/uploads/2024/01/20240104061040880404.webp)
6.移除CentOS7的yum,后续会自动安装回来
dnf -y remove yum yum-metadata-parser![图片[5]-CentOS7迁移Rocky Linux8教程-小鸟游星野的小窝](https://mybailu.cn/wp-content/uploads/2024/01/20240104061219722966.webp)
7.安装Rocky Linux 8的源(以下命令请分开执行)
rpm -e --nodeps `rpm -qa|grep centos-`

rpm -ivh --nodeps --force https://mirrors.aliyun.com/rockylinux/8/BaseOS/x86_64/os/Packages/r/rocky-release-8.10-1.9.el8.noarch.rpm

rpm -ivh --nodeps  --force https://mirrors.aliyun.com/rockylinux/8/BaseOS/x86_64/os/Packages/r/rocky-repos-8.10-1.9.el8.noarch.rpm

rpm -ivh --nodeps --force https://mirrors.aliyun.com/rockylinux/8/BaseOS/x86_64/os/Packages/r/rocky-gpg-keys-8.10-1.9.el8.noarch.rpm

dnf -y upgrade https://dl.fedoraproject.org/pub/epel/epel-release-latest-8.noarch.rpm

dnf clean all
![图片[6]-CentOS7迁移Rocky Linux8教程-小鸟游星野的小窝](https://mybailu.cn/wp-content/uploads/2024/01/20240104061521328555.webp)
8.卸载Centos7的内核,并修改python编码,此过程中不要重启
rpm -e --nodeps `rpm -qa|grep -i kernel`![图片[7]-CentOS7迁移Rocky Linux8教程-小鸟游星野的小窝](https://mybailu.cn/wp-content/uploads/2024/01/20240104061714844096.webp)
修改python2编码(按i编辑;ESC退出编辑模式)
vi /usr/lib/python2.7/site-packages/sitecustomize.py
把下面这段代码加入文件里面(输入完成后,按ESC。 :wq为保存 :q为退出且不保存)
# encoding=utf8
import sys

reload(sys)
sys.setdefaultencoding('utf8')
# encoding=utf8  import sys    reload(sys)  sys.setdefaultencoding('utf8')
![图片[8]-CentOS7迁移Rocky Linux8教程-小鸟游星野的小窝](https://mybailu.cn/wp-content/uploads/2024/01/20240104062316660279.webp)
9.更新到Rocky Linux8.9,此处一般会有多个报错,如果没有报错,请继续往下操作。
dnf -y --releasever=8 --allowerasing --setopt=deltarpm=false distro-sync(1)执行完上面的命令后,如果报下面的错,请把红框里面的包名(可能有多个包,请重复下面的步骤,直到不提示错误)替换到下面命令(请认真阅读错误提示!)
![图片[9]-CentOS7迁移Rocky Linux8教程-小鸟游星野的小窝](https://mybailu.cn/wp-content/uploads/2024/01/20240104064811608958.png)
find /var/cache/dnf/ -name *报错的包名*

例如:
find /var/cache/dnf/ -name *annobin-11.13-2.el8.x86_64*

rpm -ivh --nodeps --force /var/cache/dnf/appstream-62ae9a0bbea44fbe/packages/annobin-11.13-2.el8.x86_64.rpm![图片[10]-CentOS7迁移Rocky Linux8教程-小鸟游星野的小窝](https://mybailu.cn/wp-content/uploads/2024/01/20240104065608275592.png)
然后往下操作:
dnf -y --releasever=8 --allowerasing --setopt=deltarpm=false distro-sync(2)发现这种报错后,先卸载类似于图中from package后面的包名
![图片[11]-CentOS7迁移Rocky Linux8教程-小鸟游星野的小窝](https://mybailu.cn/wp-content/uploads/2024/01/20240104065943972080.png)
rpm -e --nodeps centos-release-7-9.2009.1.el7.centos.x86_64

rpm -e --nodeps sysvinit-tools-2.88-14.dsf.el7.x86_64

rpm -e --nodeps python36-rpmconf-1.1.7-1.el7.1.noarch

rpm -e --nodeps cmake3-3.17.5-1.el7.x86_64![图片[12]-CentOS7迁移Rocky Linux8教程-小鸟游星野的小窝](https://mybailu.cn/wp-content/uploads/2024/01/20240104070232645818.png)
卸载完后,再次执行命令,此过程需要一定时间:
dnf -y --releasever=8 --allowerasing --setopt=deltarpm=false distro-sync
![图片[13]-CentOS7迁移Rocky Linux8教程-小鸟游星野的小窝](https://mybailu.cn/wp-content/uploads/2024/01/20240104071350692848.png)
10.执行rpmconf,会出现如下界面,一直输入y和回车即可
rpmconf -a![图片[14]-CentOS7迁移Rocky Linux8教程-小鸟游星野的小窝](https://mybailu.cn/wp-content/uploads/2024/01/20240104071504888253.png)
11.安装Rocky Linux 8的内核
dnf -y install kernel kernel-core

dnf -y install shim grub2-tools-extra grubby grub2-common grub2-pc

dnf -y install grub2-tools-efi grub2-tools-minimal grub2-efi grub2-pc-modules grub2-tools![图片[15]-CentOS7迁移Rocky Linux8教程-小鸟游星野的小窝](https://mybailu.cn/wp-content/uploads/2024/01/20240104071959431744.png)
12.设置引导项
查看分区表类型
fdisk -l![图片[16]-CentOS7迁移Rocky Linux8教程-小鸟游星野的小窝](https://mybailu.cn/wp-content/uploads/2024/01/20240104072311347615.png)
(1)若是GPT分区(UEFI的BIOS),请执行
export grubcfg=`find /boot/ -name rocky`

grub2-mkconfig -o $grubcfg/grub.cfg

rm -rf `find /boot/ -name centos`添加UEFI启动项(图中/dev/nvme0n1为efi分区所在磁盘,请根据实际情况自行选择磁盘路径,具体参考上图,-p后面是分区位置(默认为1),efi分区为/dev/nvme0n1p1值就是1, efi分区为/dev/nvme0n1p2值就是2)
efibootmgr -c -w -L "RockyLinux" -d /dev/nvme0n1 -p 1 -l \\EFI\\Boot\\bootx64.efi![图片[17]-CentOS7迁移Rocky Linux8教程-小鸟游星野的小窝](https://mybailu.cn/wp-content/uploads/2024/01/20240104072407123296.png)
(2)若是MBR分区(传统引导的BIOS,注意/dev/vda需根据实际情况自行选择磁盘路径,具体参考上图),请执行
grub2-mkconfig -o /boot/grub2/grub.cfg

grub2-install /dev/vda![图片[18]-CentOS7迁移Rocky Linux8教程-小鸟游星野的小窝](https://mybailu.cn/wp-content/uploads/2024/01/20240104072850279081.png)
13.安装基础环境
rm -rf /etc/yum

dnf -y groupinstall "Minimal Install"![图片[19]-CentOS7迁移Rocky Linux8教程-小鸟游星野的小窝](https://mybailu.cn/wp-content/uploads/2024/01/20240104073119018712.png)
14.重启你的设备,即可体验Rocky Linux
reboot附:验证系统发行版
hostnamectl![图片[20]-CentOS7迁移Rocky Linux8教程-小鸟游星野的小窝](https://mybailu.cn/wp-content/uploads/2024/01/20240104073439896646.png)


暂无评论内容